Today, projectors have become very popular in many settings, including offices, schools, homes, and more. For 2020, more than 210 million have been used.
You can place your projector on a table, fix it on your bookshelf or hang it from the ceiling. So, is it possible to mount it on a vaulted ceiling?
The good news is that the answer is yes. Here is a detailed guide on how to mount a projector on a vaulted ceiling. Let’s get into the details!
Contents
How to Mount a Projector on a Vaulted Ceiling?
Follow these steps, and you will easily mount your projector on a vaulted ceiling. let’s check them out to get the job done!
Decide The Screen Placement
Determine the Throw Distance
The throw distance refers to the space from your projector’s lens to your screen. Any projector comes with a throw ratio. It can be a number or a range, and you can use it to determine how far a projector would be from a screen using this formula:
The throw distance = The projector’s throw ratio x Your screen’s width
You can use this formula for all units of measurement, such as feet, centimeters, and inches.
For example: if the ratio is 1.4:1 and your screen is 100 inches, you should put your projector 140 inches (or 355.6cm or 11.67ft) away from your screen.
Based on the above formula, you can choose the appropriate screen size, depending on the position of your projector. Just apply the switched formula:
The ideal screen’s width = The throw distance/ The throw ratio
Related: How far does a projector have to be from a 120-screen?
Find the Ideal Throw Distance
Once you have determined the throw distance range, you will know the ideal place to place your projector in your room.
But remember the following things while evaluating:
- Most projectors come with cables: One for power and the other for HDMI. The space between your receiver and your projector will determine if your projector can be plugged in.
- You won’t want to hang it directly over your head, relying on how heavy or big the projector is.
- We recommend experimenting with some distances before determining a final spot for your projector.
Find Vertical Placement
The vertical offset of a projector will determine how low or high the image would be projected to reach the expected screen height.
It’s usually in the form of a percentage which can be found in your user guide.
The positive offset refers to the image being higher than the lens, while the negative one involves the image being lower.
It’s essential to pay attention to the positive offset as your projector will be put upside down. Adjusting your projector’s lens shift while holding it at several heights will be a great test before mounting it.
Some models have a vertical lens shift feature, allowing you to change the image height without moving your projector.
Calculate Horizontal Lens Shift
Calculating the horizontal lens shift is necessary if your projector needs to be attached close to your screen’s center.
The horizontal lens shift rules are similar to vertical lens shift, but you need to use the following formula to calculate it:
The width of your screen x the offset percentage = Distance of lens to the left/right of your screen center.
Pick Your Screen
You can use a white cloth or a clean wall instead of a screen. However, it won’t bring you the best experience.
We recommend investing in a dedicated projector screen. Although they can be expensive, they make the images from your projector a thousand times better.
Related: How to hang a projector screen from ceiling?
Mount Your Projector
First, you will need to connect the wall studs perfectly. Locate and mark them utilizing one stud finder and a pencil.
To correctly sustain your projector’s weight, you should run mounting screws through a join or stud. After that, use a drill to bore a hole through the designated place.
If you want to find the ceiling joist, you’ll need to tap your vaulted ceiling utilizing your palm and attend to the sound, as Stud finders do not work your vaulted ceilings.
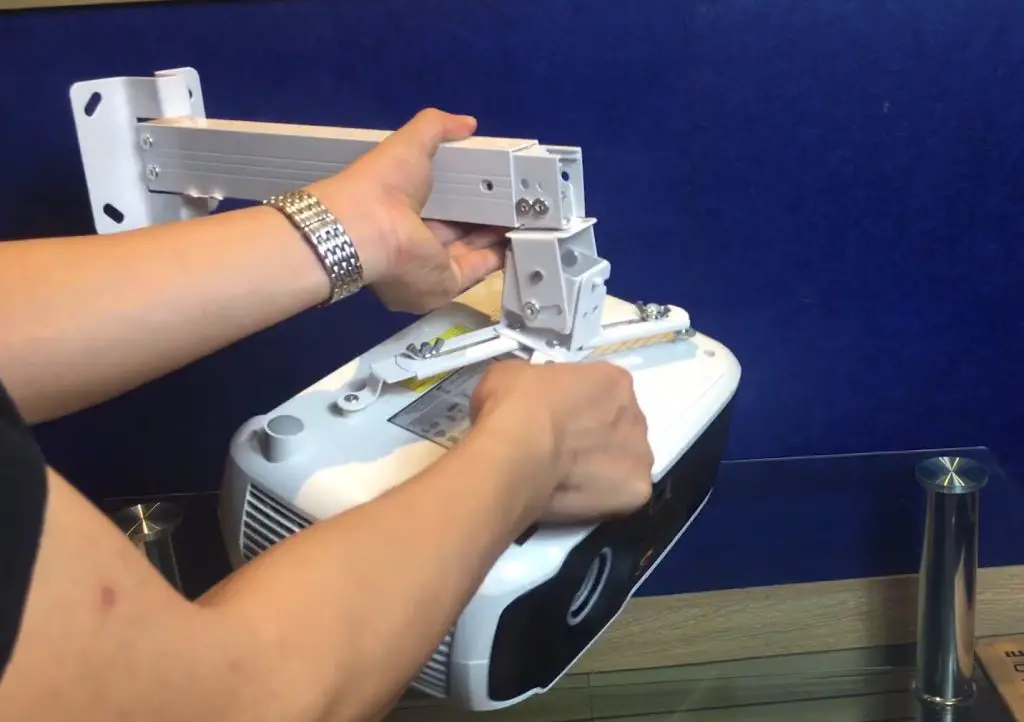
Use Projector Ceiling Plate
Put this plate at the location’s top where you install your projector. Screw the plate if you want to mount your device on a vaulted ceiling. Your screws should be inserted into studs for the highest security.
The next step is to create a hole in your roof to go to the pipe. Projector ceiling plates come with a bracket attached to the pipe and your projector. So ensure to obtain one of them. Then, installing the projector and the mount is easy.
Connect Wires for Your Projector
Once you’ve navigated the wires down your wall, it is time to drill one hole in the top stud from the attic.
Pick up drywall mud before cutting the damaged sheetrock to the closest studs. After that, cut one patch piece to replace the gap.
The sheetrock muck will then carry you to the seams. Create one hole in your wall to accommodate the wiring, then conceal it using a faceplate. From your attic, navigate all cables through your wall.
Ensure the HDMI wire of your projector is tucked away by getting help from an electrician. In addition, if you want to save your budget, running your wires through your wall in trunking is okay.
Related: Best projector under 1000
Adjust Your Projector’s Picture
Adjust the projector’s lens shift, focus, and zoom using your owner’s manual.
Fine-tune the contrast, brightness, and color according to the recommendations in your instructions.
Adjust the picture and make sure it is as precise as possible and everything is okay before you finish installing it.
Conclusion
You have reached our guide on mounting a projector on a vaulted ceiling. This project isn’t as easy as mounting your projector to a flat ceiling or placing it on a table, but it’s possible. Follow our steps, and you will get the job done quickly!